Welcome to Wisnex aqua fittings installation instructional part. Today, we’re going show you how to correctly install push-to connect fittings. Now remember, Wisnex series quick connectors can be used on PE, copper and SS tubes.
Wisnex Aqua Fitting’s Install Instruction:
- The tube which needs to be inserted should be cut vertically, it will lead to loose in sealing even leakage if there is a pitch.
- The surface of the tube should be smooth, it shouldn’t be with scratch, if there is a scratch then should cut the tube vertically.
- When using metal tubing, make sure the tube end is smooth to avoid potential cutting or any other damage to the o-ring.
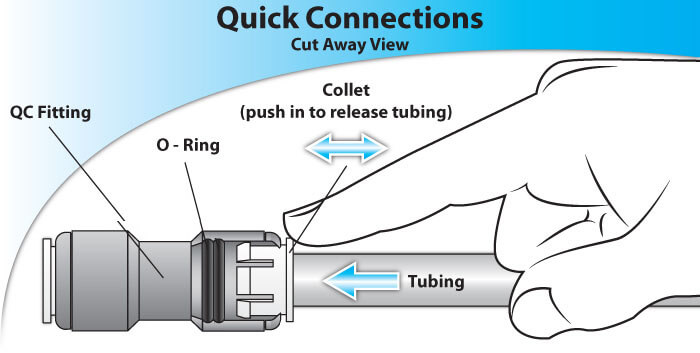
- When making a tube connection, occasionally a gripping of the tube may occur just as the tube begins to pass through the o-ring, although the seal is not yet made, push the tube deeply once more to complete assembly of the connection in this case. Failure to completely insert the tube into the fittings may cause the leakage.
- When tightening threaded fittings, don’t over-torque the fitting as this may damage the fitting and lead leaking or other failure.
- Must put on the clips after finishing the connection under the collects.
- After assembling a tube connection, tug with moderate force to check for correct gripping of the tube.
- Don’t over-stress the fitting by rotation, twist, bending, shock, fatigue or other excess force, this may damage the fitting, collect will may dislocation and distortion.
- Before disassembling tube connection, always make sure that pressure has been removed from the system.
- When disassembling tube connections, take out the clip and then press the collect evenly toward the body and then pull out the tube.
- Be careful if the liquids are to be used is not water and beverage, please advise the chemical components to us before using it.
For more information on wisnex quick fittings, please see the details in catalogue or contact us directly.


